本文简单介绍groovyBoot的快速上手开发。
1. 创建工程
1.1. 使用浏览器访问
使用浏览器访问项目起步器, ,填写项目源信息, 选择使用插件(如:gb web with spring security (已集成配置))。
点击“生成项目结构”按钮,下载zip包就是工程的项目框架。
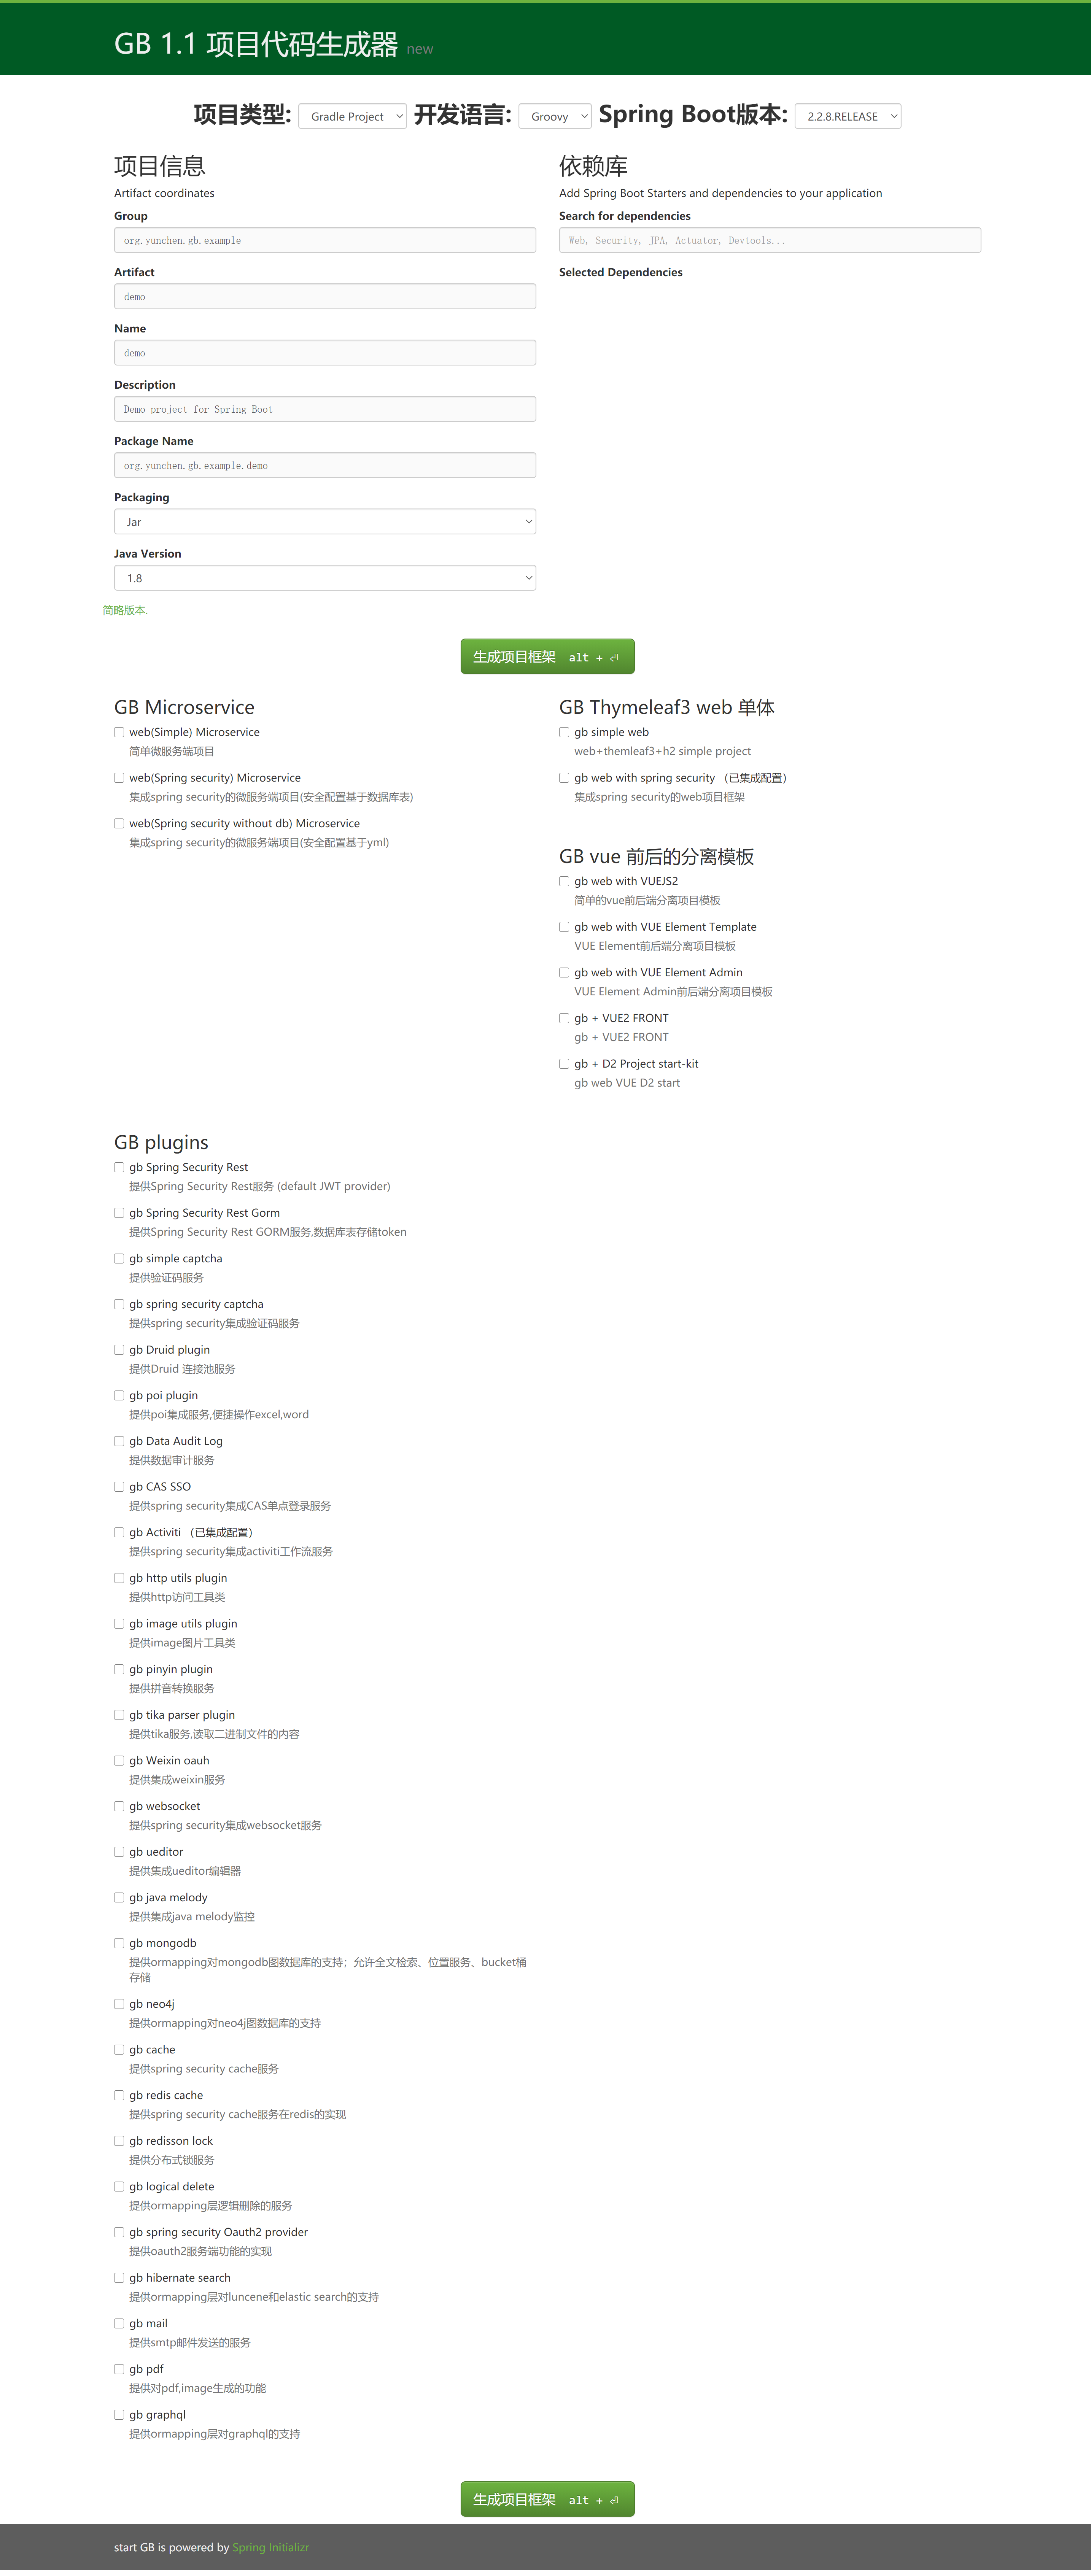
| 其中标注(已集成配置) 的插件,使用initializr创建工程后,已自动配置完毕,可直接使用。其他未标注的插件,需要参考相关的插件文档进行手动配置。 |
1.2. 使用idea intellij访问
在intellij中点击File→New →Project ,选择spring initializr类型,将server url地址定制为: start.declare.org.cn
按wizard提示,填写项目源信息,选择使用插件(如:gb web with spring security (已集成配置)),将生成相关工程。
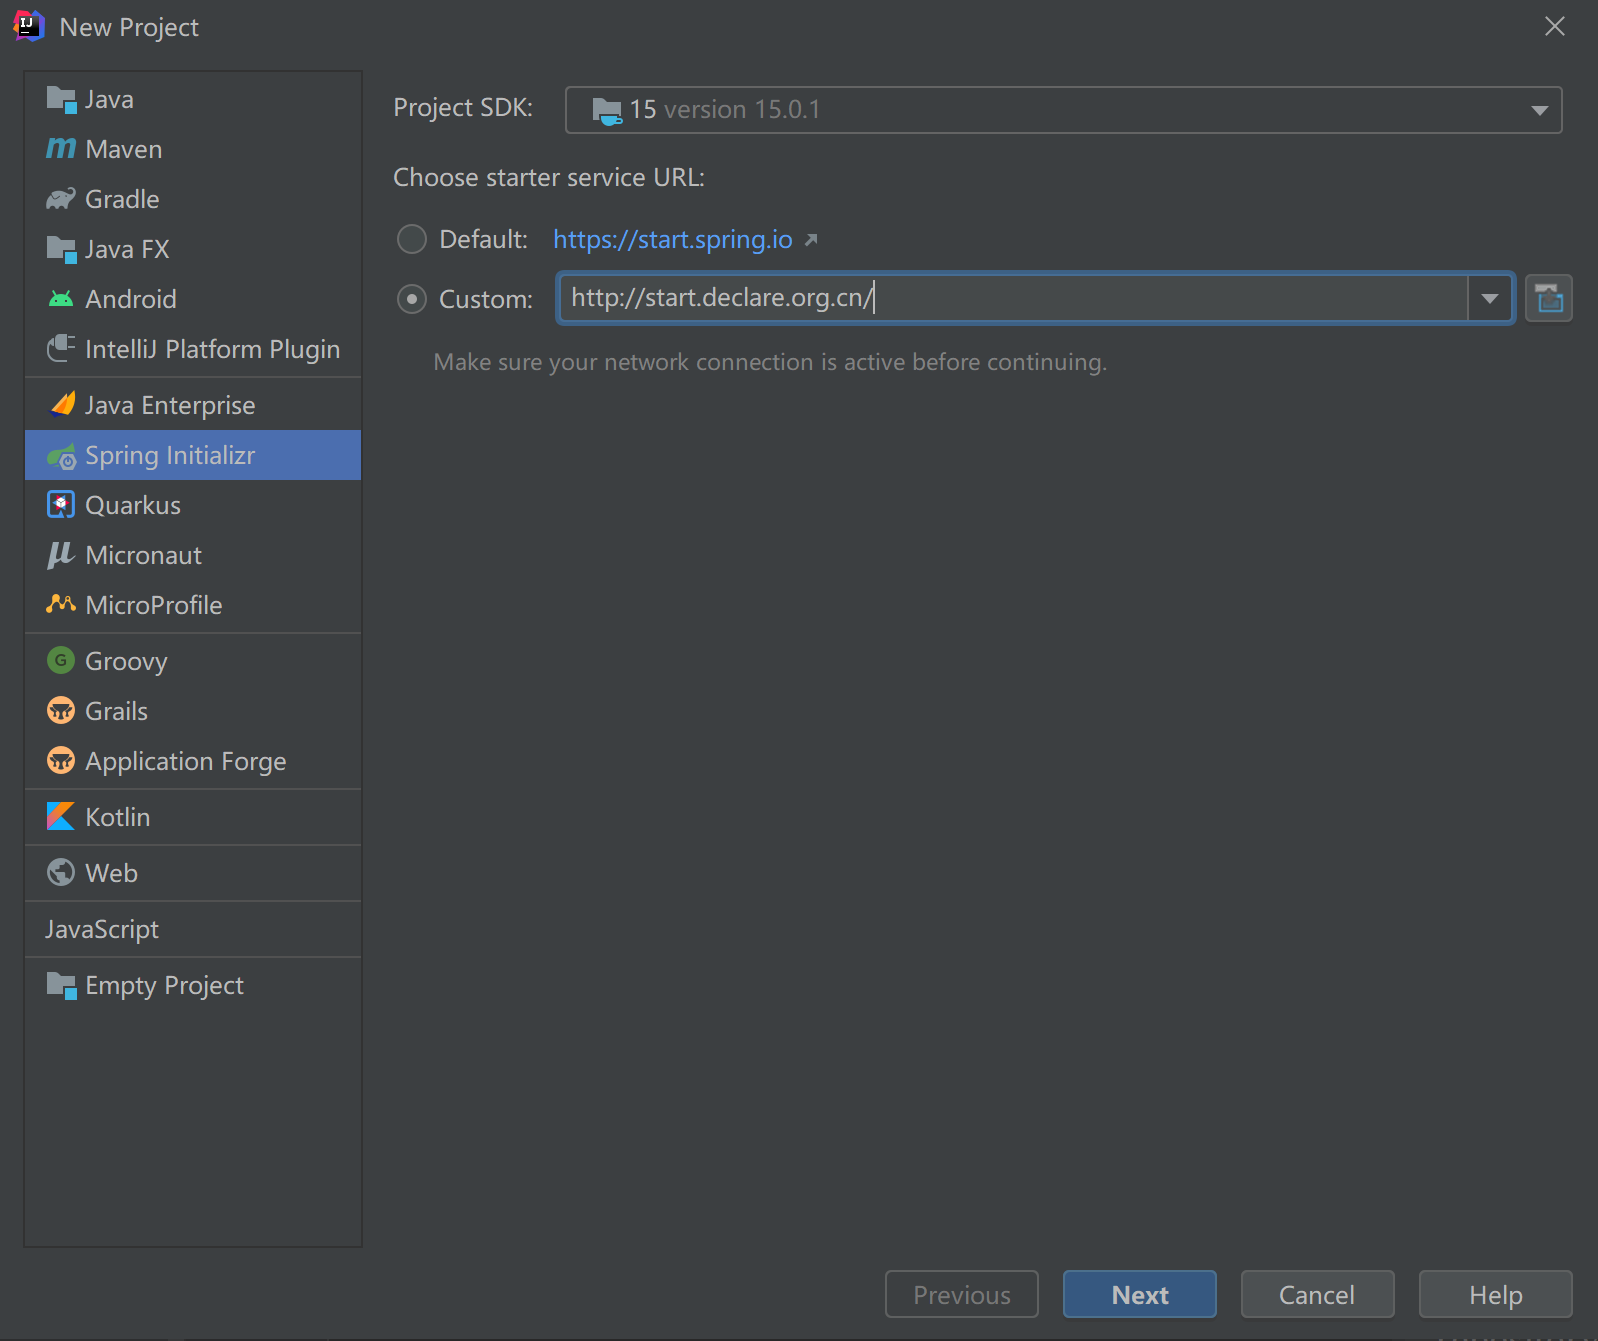
因为生成的工程是基于gradle构建的,IDEA会自动提示引入文件,因为默认工程中包含了gradle的wrapper包装器,只要同意即可。
| 具体项目的结构参考 项目结构介绍 |
2. 简单示例
默认生成的项目工程已经包含了基本的安全防护,相关的GROM配置,thymeleaf的集成。下面通过一个简单的示例,熟悉一下数据类操作的逻辑。
2.1. 运行
运行DemoApplication.groovy类能看到系统的界面效果
默认有两个角色,分别是ROLE_ADMIN和ROLE_USER;两个用户被创建,分别是admin和user
| 名称 | 描述 | 说明 |
|---|---|---|
admin |
ROLE_ADMIN |
|
user |
ROLE_USER |
| 操作代码都在 init包下的Startup类中。项目中可以有多个Startup类,执行时按照类上的@Order注解值从小到大的顺序同步执行。 |
2.2. 内置工具
开发模式下,内置了/dbconsole 和 /webconsole/index
| 名称 | 描述 | 说明 |
|---|---|---|
/dbconsole |
H2内置的数据查看器 |
在yml配置中开启、关闭 |
/webconsole/index |
系统内置的代码生成器 |
根据/resources/templates/tools/scaffolding目录的内容生成代码 |
2.3. 图书和作者的示例
使用简单的图书和作者这种1对1或1对多的关系,来示例项目开发的规则
| 项目中的BASE_USER和BASE_ROLE的多对多关系使用中间表来实现,可参看。 |
2.4. domain 类
在domain目录创建文件Author.groovy和Book.groovy文件。内容如下:
import org.yunchen.gb.core.annotation.Title
import com.fasterxml.jackson.annotation.JsonFormat
import com.fasterxml.jackson.annotation.JsonIgnore
import com.fasterxml.jackson.annotation.JsonIgnoreProperties
import grails.gorm.annotation.Entity
import org.grails.datastore.gorm.GormEntity
import org.springframework.format.annotation.DateTimeFormat

@Entity  (1)
@Title(zh_CN = "作者")  (2)
@JsonIgnoreProperties(["errors", "metaClass", "dirty", "attached", "dirtyPropertyNames","handler","target","session","entityPersisters","hibernateLazyInitializer","initialized","proxyKey","children"])
class Author {  (3)
   @Title(zh_CN = "名称")
   String name
   @Title(zh_CN = "生日")
   @JsonFormat(pattern = "yyyy-MM-dd",timezone="GMT+8")   (4)
   @DateTimeFormat(pattern="yyyy-MM-dd") //with spring mvc   (5)
   Date birthday
   static constraints = {
        name(blank:false,unique: true,size:0..100)
        birthday()
    }
  static mapping = {

  }
  String toString(){
        return name
  }
}| 1 | 标注为grails.gorm.annotation.Entity实体 |
| 2 | 增加中文注释注解,为未来自动生成代码提供帮助 |
| 3 | 实现GormEntity接口,以便IDEA可以提供智能提醒 |
| 4 | 标注字段生成json时采用的转换格式(jacketjson) |
| 5 | spring mvc 的controller自动组装参数时格式限定 |
import org.yunchen.gb.core.annotation.Title
import com.fasterxml.jackson.annotation.JsonFormat
import com.fasterxml.jackson.annotation.JsonIgnoreProperties
import grails.persistence.Entity
import org.grails.datastore.gorm.GormEntity
import org.springframework.format.annotation.DateTimeFormat
@Entity
@Title(zh_CN = "图书")
@JsonIgnoreProperties(["errors", "metaClass", "dirty", "attached", "dirtyPropertyNames","handler","target","session","entityPersisters","hibernateLazyInitializer","initialized","proxyKey","children"])
class Book {
    @Title(zh_CN = "作者")
    Author author
    @Title(zh_CN = "标题")
    String title
    @Title(zh_CN = "价格")
    double price
    @Title(zh_CN = "出版日期")
    @DateTimeFormat(pattern="yyyy-MM-dd")
    @JsonFormat(pattern = "yyyy-MM-dd",timezone="GMT+8")
    Date publishDate
    static constraints = {
        title (nullable: false,size: 0..10, unique: true, blank:false)
        price(min:0d,max:200d)
        publishDate(nullable:false)
    }
    static mapping = {
        comment "图书表"
        title(index:"BOOK_TITLE_INDEX");
        price(column: "PRICE_COLUMN",defaultValue : 0)
    }
    String toString(){
        return title
    }
}
2.5. controller 和 service
重启Application应用 ,使用admin/admin登录系统,访问/dbconsole 数据库控制台,输入当前数据源的地址后,可以看到数据表已自动映射建立。
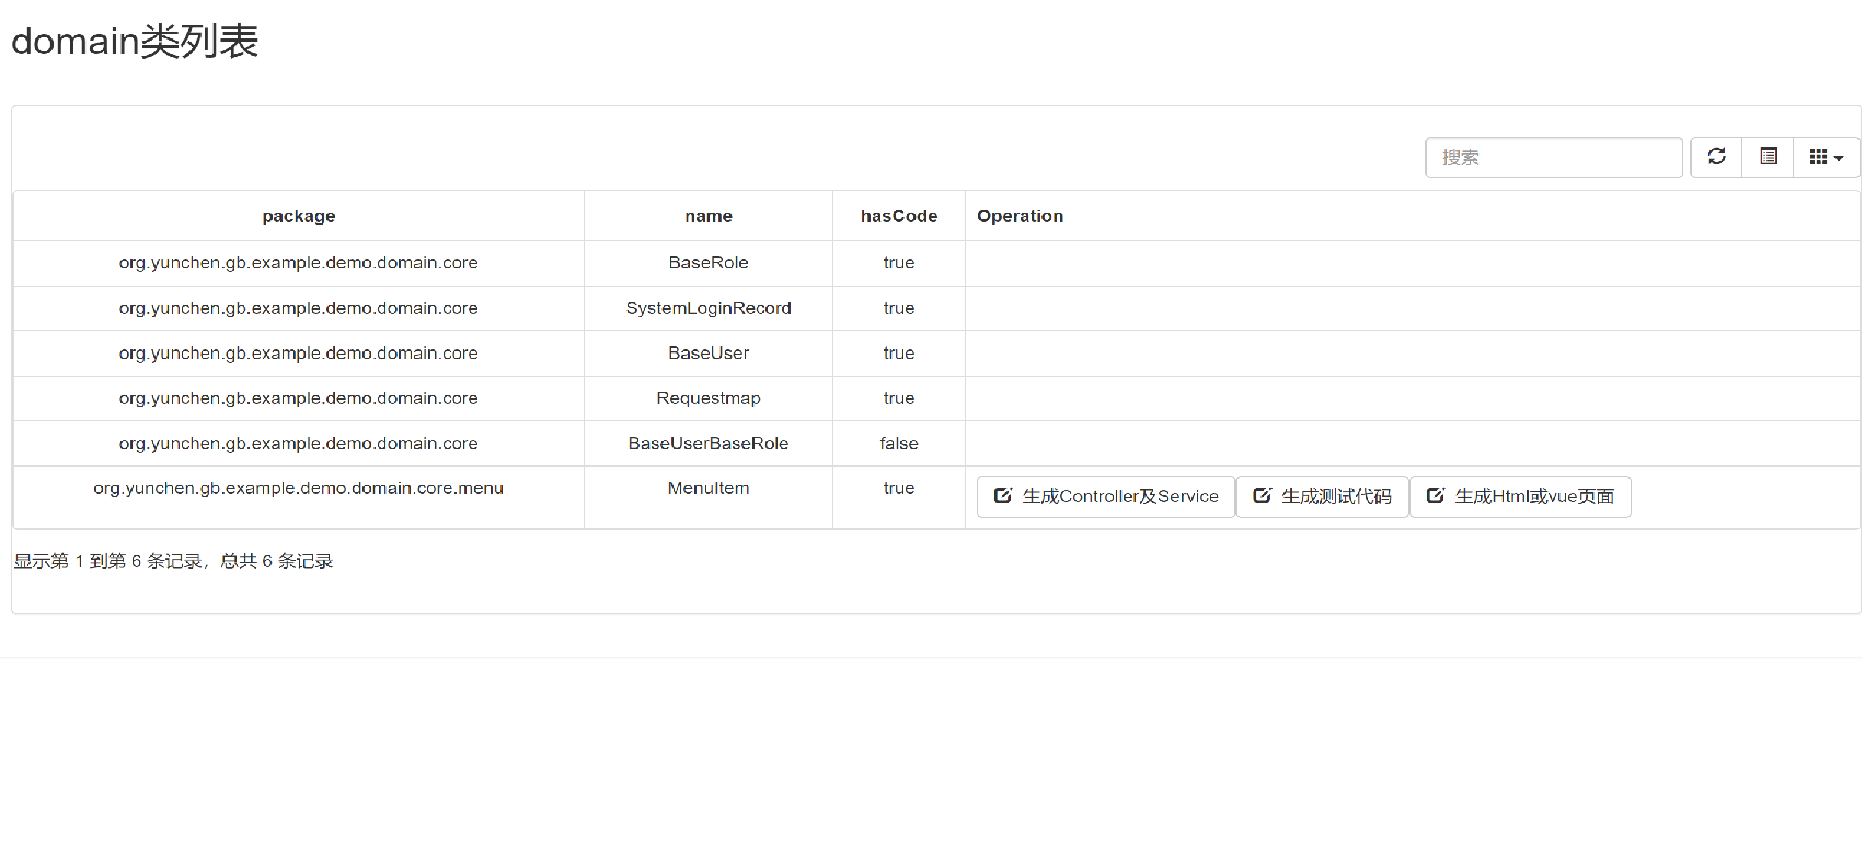
访问/webconsole/index 代码生成器,选择Author和Book这两个domain类,点击“生成controller和测试类”按钮,系统在controller目录和test目录生成相关类。
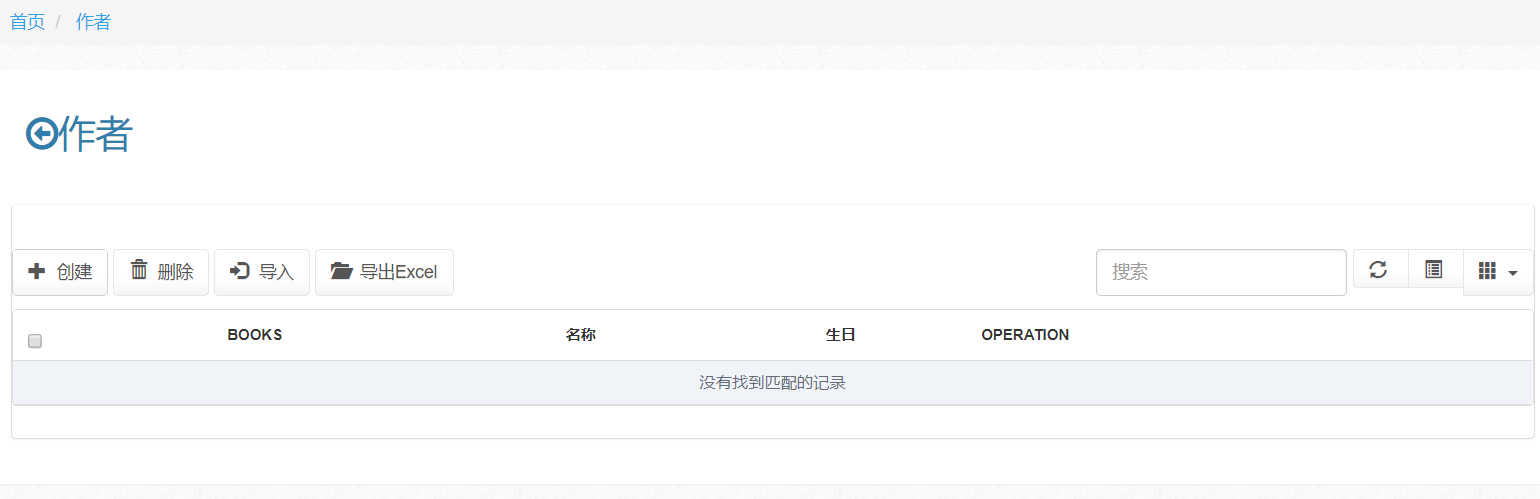
重启Application应用 (再次),使用admin/admin登录系统,访问/author/index和/book/index ,可以发现,系统已经提供CRUD的操作界面和验证逻辑。
| 可以参看生成的service代码来熟悉GORM在字节码增强的方法 |
2.6. 支持微服务模式
默认项目中已经集成了安全rest组件,支持JWT的方式访问系统API。
可使用postman访问rest服务端的端点,了解springSecurityRest工作原理。
| 地址 | 描述 |
|---|---|
/api/login |
登录授权 |
/api/logout |
系统退出(jwt不支持) |
/api/validate |
验证${access_token} |
/oauth/access_token |
刷新令牌 |
/application/index |
获取应用信息 |
在idea中打开HTTP client 工具,输入以下操作
### 登录系统

POST http://localhost:8080/api/login
Content-Type: application/json

{"username":"user","password":"user"}


### 访问安全控制API地址

GET http://localhost:8080/baseUser/json
Content-Type: application/json
Authorization: Bearer eyJhbGciOiJIUzI1NiJ9.eyJwcmluY2lwYWwiOiJINHNJQUFBQUFBQUFBSldUVFdcL1RRQkNHTnlGVlFaV2dSUUtKUTdsUWJ1RGF

{}
//根据token的权限不同,获得不同的结果信息
<> 2022-05-02T063548.200.json  //获取正常json数据
<> 2022-05-02T063549.403.json  //获得权限不足的json信息

### 刷新token

POST http://localhost:8080/oauth/access_token
Content-Type: application/json

{"grant_type": "refresh_token","refresh_token": "eyJhbGciOiJIUzI1NiJ9.eyJwcmluY2lwYWwiOiJINHNJQUFBQUFBQUFBSldUVFdcL1RRQkNHTnlGVlFaV2dSUUtKUTdsUWJ1RGFUbXp"}

<> 2022-05-02T063112.200.json
| 详细请参阅安全rest组件 |
3. 生成制品
3.1. 独立jar包
修改yml文件中的 spring.profiles.active: production
运行gradle 的 assemble命令,jar包生成在build/libs目录下
3.2. docker image
运行gradle 的docker 命令 ,会生成本地的docker image,名称使用build.gradle 中的group值+bootJar.baseName的名称
3.3. kubernetes
配合jenkins,使用项目的jenkinsfile,则会生成K8s的服务
4. 项目形式
本部分介绍一下起步器下,生成项目的分类
4.1. 单体应用
gb simple web:是一个没有安全防护的简单项目框架
gb web with spring security: 是集成spring security的web项目框架
4.2. 微服务
web(Simple) Microservice :简单微服务端项目,全部输出json格式
web(Spring security) Microservice :集成spring security的微服务端项目(安全配置基于数据库表)
web(Spring security without db) Microservice :集成spring security的微服务端项目(安全配置基于yml)
4.3. 前后端分离
提供vue前端项目和后端项目的多项目工程